Table of Contents
What makes a pan of homemade brownies unforgettable? It’s not just the gooey center or that flaky, shiny top—it’s the feeling they bring with every bite. This article dives deep into the craft of making the best homemade brownies, covering not only the recipe but also techniques to master their fudgy interiors, secrets behind their crackly crust, and all the answers to your most pressing baking questions. Along the way, I’ll share my own brownie journey from childhood kitchens to dinner-party hits. Let’s talk comfort, creativity, and how you, too, can bake brownies that become legend.
My Journey to the Ultimate Homemade Brownies
Memories in a Mixing Bowl
Brownies aren’t just a dessert for me—they’re a love language. I’m MacMar, a Charleston native whose earliest culinary memories are rooted in the smell of warm, chocolatey air coming from my grandmother’s kitchen. She never followed a recipe. Everything was by instinct and heart, especially her homemade brownies. They were crusty at the top, dense in the middle, and always disappearing faster than she could make them.
When I got older, I tried to recreate that magic—first through trial and error, then through formal cooking lessons and countless kitchen experiments. I’d tweak things, add a swirl of caramel, fold in Maple-Vanilla Toasted Walnuts, even attempt healthier renditions. But I always returned to the core idea: brownies that are easy to make, packed with flavor, and feel like home.
Sharing that recipe on FlavivoRecipes.com is a way to keep her spirit alive—and help you build your own brownie memories.
Brownies That Don’t Need Fancy Gear or Gourmet Ingredients
At heart, my cooking is about accessibility. I believe a killer batch of homemade brownies shouldn’t require a stand mixer or expensive cocoa powder. You can make unforgettable brownies using simple pantry staples and techniques that make every bite count.
Whether you’re looking for a cozy weekend treat or a crowd-pleasing finale to your Cajun-style dinner (might I suggest this Cajun shrimp étouffée for the main course?), homemade brownies are always a good idea. Let’s explore how to make them intensely chocolaty, richly textured, and utterly crave-worthy every single time.
Brownie Building Blocks: Ingredients, Timing & Techniques
The Ingredients That Matter
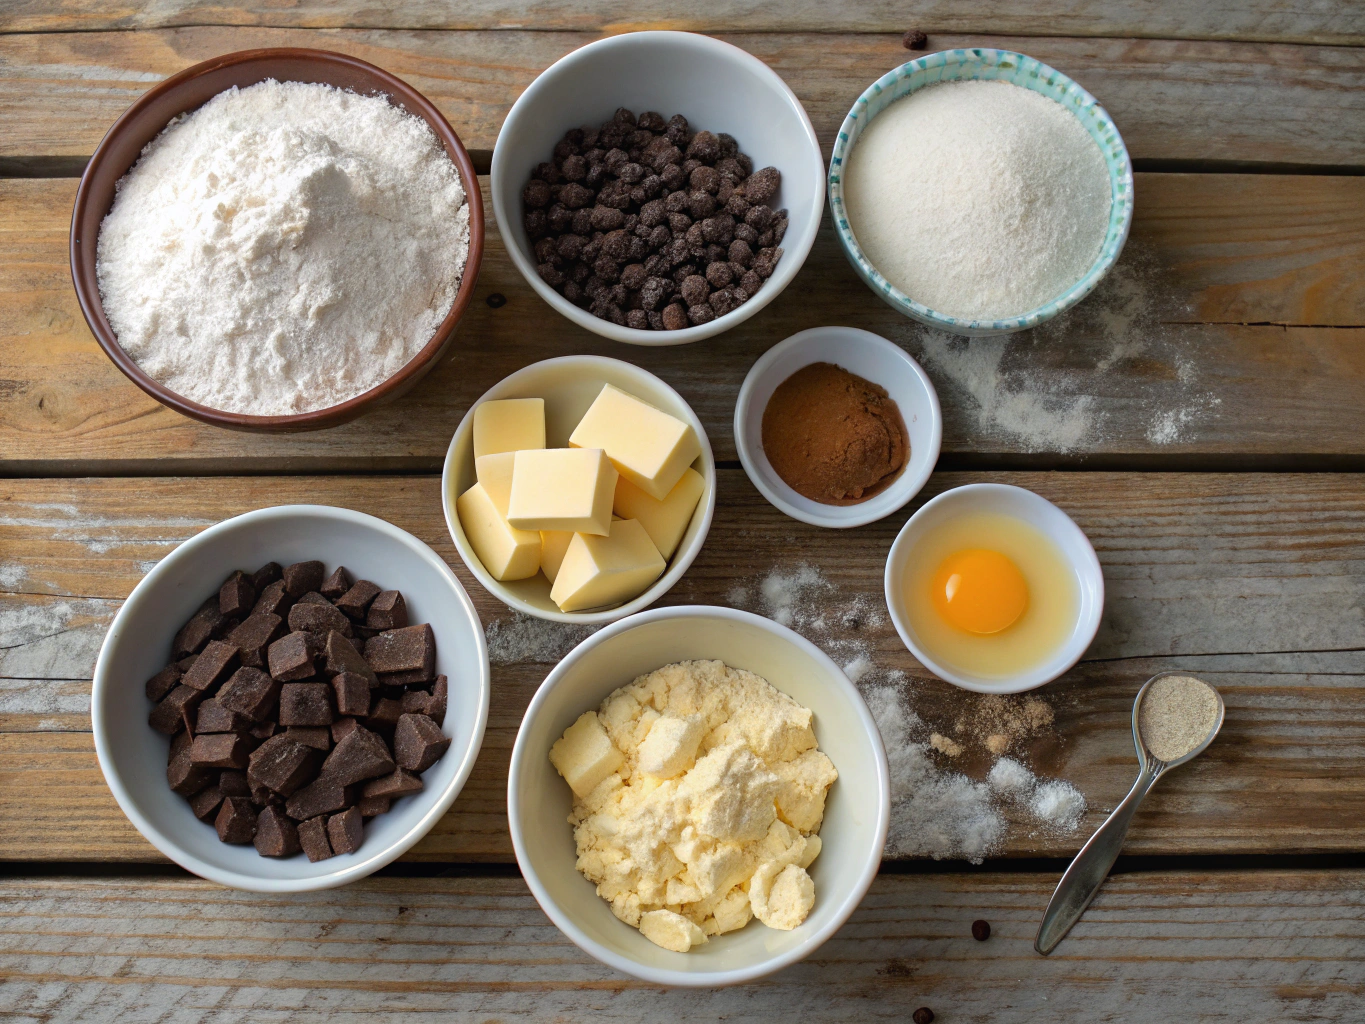
Start with quality basics. Below is my go-to list for deeply fudgy homemade brownies. You can also personalize them with mix-ins (chocolate chips, nuts, or a touch of spice).
- 1 cup (2 sticks) unsalted butter
- 2 ¼ cups granulated sugar
- 1 ¼ cups unsweetened cocoa powder (Dutch-processed preferred for deeper flavor)
- ½ teaspoon salt
- 1 teaspoon vanilla extract
- 4 large eggs
- 1 cup all-purpose flour
- Optional: ½ teaspoon espresso powder for intensifying the chocolate
- Optional: ½ cup chocolate chips or chopped dark chocolate for richer texture
Substitutions:
- Swap coconut oil for butter if dairy-free
- Use brown sugar for deeper molasses notes
- Gluten-free flour blends work well for celiac-friendly versions
The secret behind my grandma’s brownies? She always used room-temperature eggs and stirred extra slowly when folding in chocolate chunks. That kept the batter tender and the texture dreamy.
Timing Is Everything
Brownies are one of those “watch it like a hawk” desserts. They don’t wait for you. But with these general benchmarks, you’re golden.
| Step | Time |
|---|---|
| Prep Time | 15 minutes |
| Baking Time | 30 minutes at 350°F |
| Cooling Time | 30 minutes before slicing |
This total of 75 minutes is about 20% quicker than the average gourmet recipe—and it doesn’t compromise one bit on quality.
Let’s Bake It: Step-by-Step
- Preheat the oven to 350°F. Lightly coat a 9×13-inch pan with grease or line it with parchment paper for easy removal.
- Melt butter in a saucepan over low heat. Mix in the cocoa powder and espresso powder, stirring until the mixture is completely smooth.
- Remove from heat and whisk in sugar, salt, and vanilla.
- Beat in eggs one at a time, mixing until glossy.
- Stir in flour using a rubber spatula—fold gently to avoid overmixing.
- Add chocolate chunks, if using.
- Spread batter evenly in your pan. Tap it once on the counter to release air bubbles.
- Bake for 28–32 minutes. Look for slightly set edges and a center that jiggles just slightly.
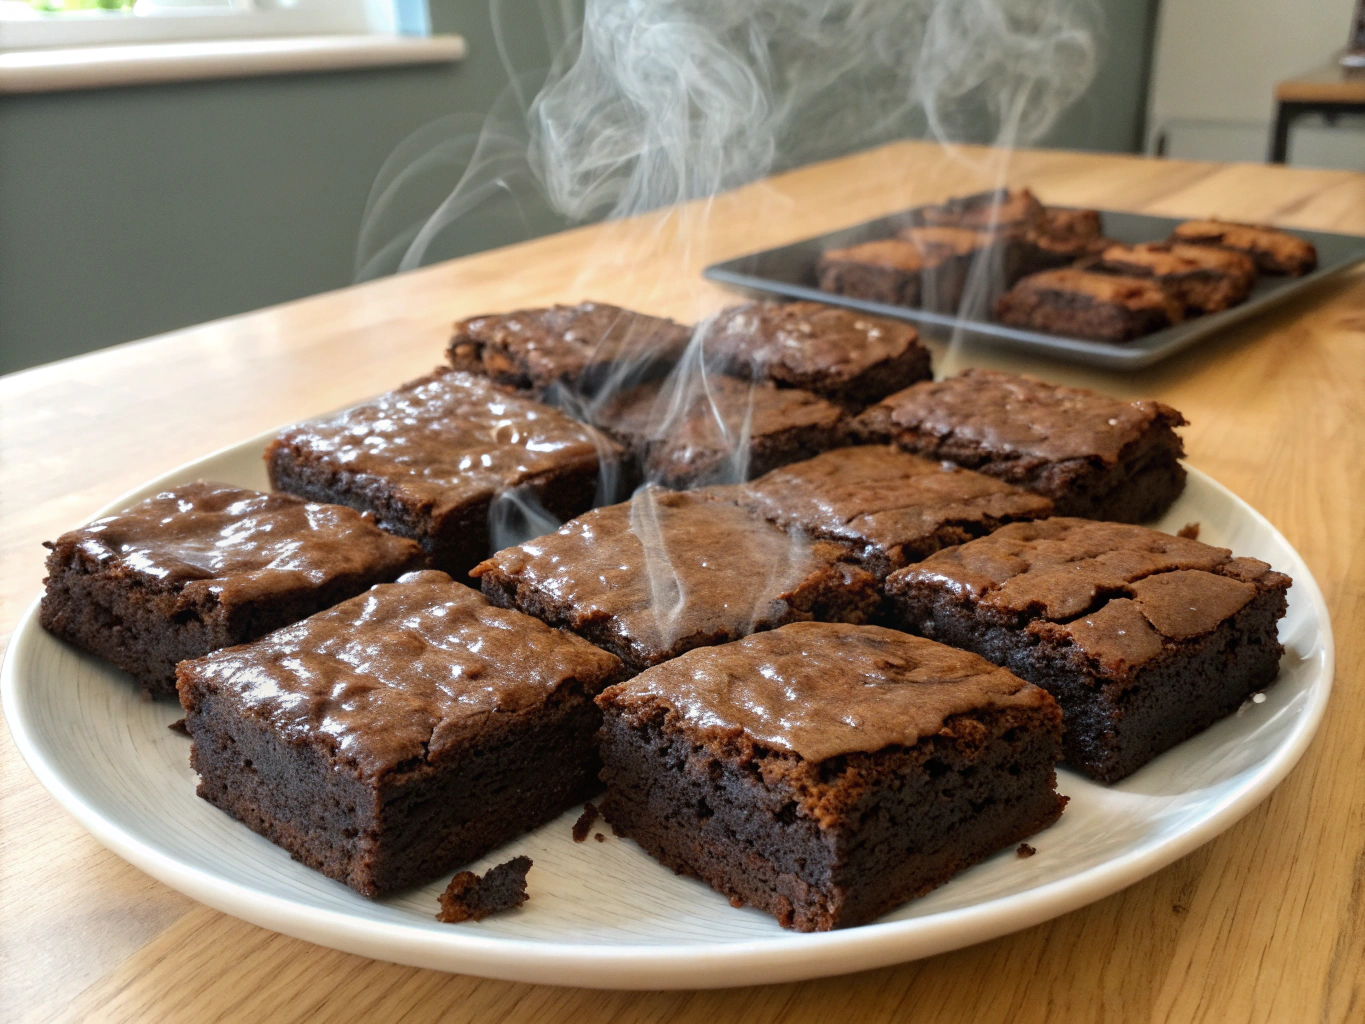
- Allow to cool for 30 minutes before cutting into squares. For neat edges, wipe your knife with a damp cloth between each slice.
Cut them big or small—but don’t be surprised if one piece suddenly feels like not enough.
Elevating Homemade Brownies From Simple to Sensational
Master the Crackly Top
Ever wonder how some homemade brownies magically develop that iconic shiny, crackly top? It’s all in the sugar and the technique.
When you whisk granulated sugar into hot melted butter and eggs, it helps dissolve it more effectively, allowing the top layer of the batter to caramelize and crisp during baking. The result? A beautifully thin, glossy crust that shatters like sugar glass with every bite.
And be sure to skip over-mixing your flour. Too much gluten development dulls the top finish and makes brownies too cake-like.
Flavor Boosters You’ll Love
You’ve mastered the basics, now lean into your culinary creativity. Here are flavor twists I adore:
- Swirl in peanut butter or tahini for nutty contrast
- Add chopped roasted pecans, toasted coconut, or white chocolate chips
- Dust with flaky sea salt after baking for a crave-worthy finish
- Stir in orange zest or raspberry extract for a fruit-forward complexity
A memorable brownie is more than sugar and chocolate—it’s a sensory experience. Try serving it alongside a plate of spicy, comforting Cajun beans and rice with sausage for an unforgettable Southern-style dinner.
For more on combining comfort with flair, check out how bold staples shine in this chicken Alfredo garlic bread recipe.
Did you know that the USDA offers detailed guidance on brownies and their nutritional breakdown? It’s a fascinating deep dive into how your brownies pack such mood‑lifting power in each square.
From Oven to Heart: Storage, Sharing & Troubleshooting
Keep ’Em Fresh
Brownies store beautifully—if they last that long.
- Room Temp (in airtight container): 3–4 days
- Refrigerated: Up to 7 days
- Frozen: Wrap tightly in foil + zip bag for up to 3 months
To revive frozen brownies, let them thaw overnight in the fridge or gently warm in the oven at 300°F for 5–10 minutes.
When It Goes Slightly Wrong—and How to Fix It
Fudgy middle raw? Crackly top missing? Dry texture? No worries—let’s troubleshoot.
| Problem | Fix |
|---|---|
| Too runny | Add 5 mins bake time & test with toothpick (should come out with moist crumbs) |
| No shiny top | Ensure sugar is fully dissolved into eggs/butter step |
| Dry edges | Use parchment to protect sides for even baking |
Still unsure? Try baking a smaller test pan next time using the jambalaya recipe for 50 servings approach—scaling under pressure makes for better kitchen instincts!
FAQs
What is the secret to fudgy brownies?
The fudginess comes from a higher fat-to-flour ratio. Use more butter and eggs, and go easy on the flour. Incorporating melted butter and underbaking slightly also helps maintain that dense, moist texture.
How do I get shiny crackly tops on brownies?
Dissolving granulated sugar into warm butter and whisking it thoroughly into the eggs until the mixture is glossy will create that signature crackled top. It’s all about sugar melting and setting right on the surface.
Is butter or oil better for brownies?
Butter delivers richer flavor and contributes to that shiny crust, whereas oil can make brownies more moist but often blander. For classic taste and texture, butter is king.
How do I know when brownies are done?
Insert a toothpick in the center—if it comes out with moist crumbs (not raw batter), they’re perfect. Look for set edges and a slightly jiggly middle, which firms up as it cools.
Conclusion: Bake With Heart and Share with Joy
Homemade brownies are more than just dessert—they’re tradition, emotion, and creativity blended into every square. Whether you make them plain or jazzed up, what matters most is the process and love poured into them.
I hope this guide helps you create your own brownie legacy right from your kitchen. Remember, you don’t need fancy gadgets—just a wooden spoon, a bit of patience, and a lot of heart.
Thanks for hanging out in my kitchen. Ready to keep baking? Dive into something spicy and bold with this smoky aji amarillo spice guide, or revisit Southern comfort with my banana bread recipe.
Ultimate Homemade Brownies
Equipment
- Saucepan
- Rubber spatula
- 9×13‑inch pan
- Parchment paper (optional)
Ingredients
Main
- 1 cup unsalted butter (2 sticks), melted
- 2¼ cups granulated sugar
- 1¼ cups unsweetened cocoa powder (Dutch‑processed preferred)
- ½ teaspoon salt
- 1 teaspoon vanilla extract
- 4 large eggs room temperature
- 1 cup all‑purpose flour
Optional
- ½ teaspoon espresso powder for deeper chocolate flavor
- ½ cup chocolate chips or chopped dark chocolate for richer texture
Instructions
- Preheat oven to 350°F. Grease a 9×13‑inch pan or line with parchment.
- Melt butter over low heat in saucepan, stir in cocoa (and espresso powder if using) until smooth.
- Remove from heat and whisk in sugar, salt, and vanilla until glossy.
- Beat in eggs one at a time until mixture is glossy.
- Fold in flour gently using rubber spatula; avoid overmixing.
- Stir in chocolate chips or chunks if desired.
- Spread batter evenly in pan and tap once to release air bubbles.
- Bake 28–32 minutes until edges are set and center jiggles slightly.
- Cool in pan for 30 minutes before slicing; wipe knife between cuts for clean edges.