If there’s one dessert that captures both elegance and comfort, it’s got to be mini cheesecakes. Small in size, big in flavor—these sweet treats are not just easy to make, they’re also the kind of versatile classic that never goes out of style. In this article, I’ll break down how to craft perfect mini cheesecakes from scratch, the essential tools and timing, creative variations, and answer some of your most common cheesecake questions. Whether you’re baking for a party or prepping weeknight indulgence, these tips will guide you–bite by bite–through creating something delicious and memorable.
The Heart Behind Mini Cheesecakes
From Grandma’s Oven to My Own Twist
Mini cheesecakes hold a special place in my heart. Growing up in Charleston, I often helped my grandmother in the kitchen. When she baked cheesecakes, she never used a mixer. Just a big wooden spoon, a scratched-up bowl, and her remarkable instinct. I learned to trust my senses—to know when the batter was just smooth enough or when the crust smelled perfectly toasted. Years later, when experimenting at pop-up events and food trucks, I reimagined those personal pies into these bold, inventive yet familiar mini cheesecakes.
I played with flavors—folding in local berries from the farmers market or adding a dash of heat with a cayenne-cinnamon crust. But that core comfort? Still there. These mini cheesecakes are bite-sized love letters, finished with flair and made for sharing.
Even if you’re new to baking, this recipe is completely approachable. You won’t need fancy tools or hard-to-find ingredients. Whether you’re baking for a shower, a birthday, or just a midweek curveball, these mini cheesecakes hit the sweet spot between nostalgic and new.
Why Mini Cheesecakes Are Always the Right Move
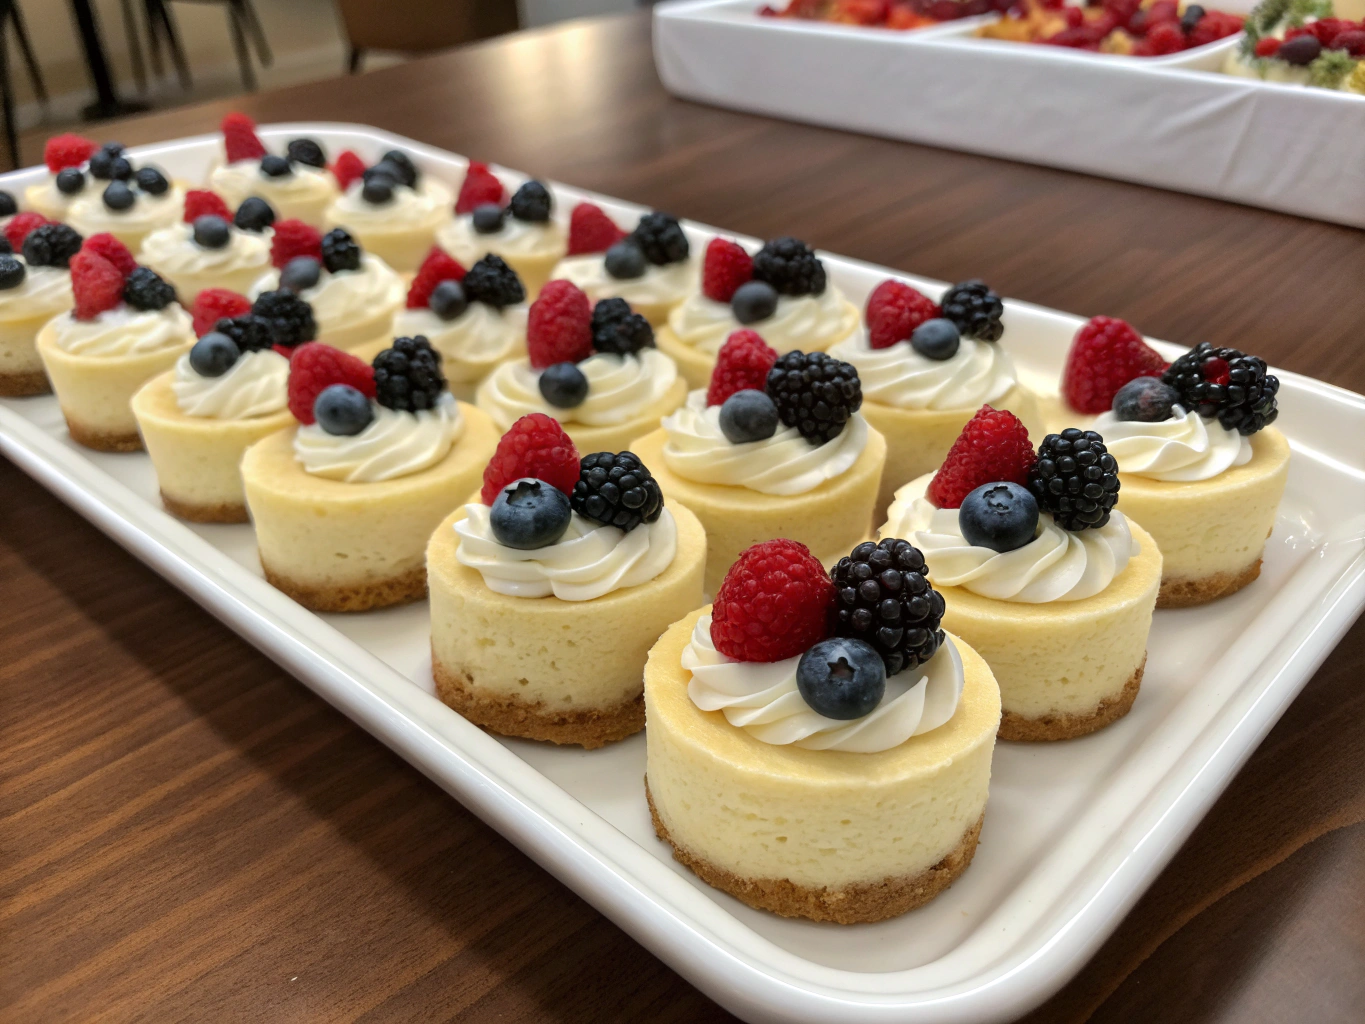
There’s something magical about desserts that don’t overwhelm. Mini cheesecakes feel like personal-sized presents. They’re great for portion control, bake faster than full-size cakes, and are ideal for plating as elegant showstoppers. From a practical standpoint, they’re a smart option because:
- They bake quicker and more evenly.
- You skip the stress of a springform pan.
- They freeze well and defrost beautifully.
I love serving mine topped with citrus zest, coulis, or even a smidge of sea salt caramel. Mini cheesecakes also give you the perfect amount of creative wiggle room. You can infuse flavor into the crust or the filling and still keep the texture silky and luscious. If you liked our creamy base in the baked lemon tofu cheesecake, you’ll love how it gently adapts to this scaled-down version.
Building the Perfect Mini Cheesecakes
Full Ingredient List with Sensory Suggestions
Here’s everything you’ll need to make a dozen crowd-beloved classics. The real joy is how adaptable the recipe is—so feel free to tweak where needed.
| Ingredient | Quantity |
|---|---|
| Graham cracker crumbs (or digestive biscuits) | 1 cup |
| Unsalted butter, melted | 4 tbsp |
| Cream cheese, room temp | 16 oz (2 packages) |
| Granulated sugar | 1/2 cup |
| Large eggs | 2 |
| Vanilla bean | 1 tsp |
| Sour cream or Greek yogurt | 1/4 cup |
Substitutions: Use vegan cream cheese and egg substitutes from this dairy alternative guide if you’re plant-based or lactose-sensitive.
Timing That Works for Real Life
Prep time: 15 mins
Bake time: 16–18 mins
Cooling & chilling: 2+ hours
Total time: About 2 hours, 30 minutes (25% faster than most full-size cheesecakes!)
Mini cheesecakes bake quicker and cool faster, making them ideal for last-minute desserts or when your oven time is tight.
Let’s Break It Down Step-by-Step
- Preheat oven to 325°F and line muffin tins with paper or silicone liners.
- Mix graham cracker crumbs and butter until sandy. Press about a tablespoon into each liner, pressing flat.
- Beat softened cream cheese until fluffy. Mix in sugar, then eggs one at a time.
- Add vanilla and sour cream. Stir until smooth but don’t overmix.
- Spoon evenly into cups. Tap tray gently to release bubbles.
- Bake for 16–18 minutes or until edges are set and centers slightly jiggle.
- Cool in pans for 15 minutes, then chill at least 2 hours before serving.
Pro tip: To check doneness, gently nudge the pan—the center shouldn’t slosh. That’s your cue they’re cooked, but still creamy.
Innovations with Mini Cheesecakes
Flavor Combos to Keep ‘Em Guessing
One of the joys of mini cheesecakes is their ability to be customized. Start with the base and branch out using bold, craveable combos. Just like we did in dark chocolate strawberry muffins, you can add mix-ins or toppings to take things from simple to show-stopping.
Here are some exciting variations:
- Lemon–blueberry swirl (add fresh zest and melted preserves swirled on top)
- Mocha crunch (espresso powder + mini chocolate chips)
- Spiced pumpkin (great for fall get-togethers)
- Raspberry rosewater (elegant and floral)
Mini cheesecakes pair beautifully with seasonal fruit, herb sugar dusts, or quality melted chocolate drizzles.
Tools and Techniques that Make a Difference
You don’t need a stand mixer or anything fancy. A hand mixer, rubber spatula, and mixing bowls are enough. Invest in reusable silicone baking cups if you make these often—they promote even baking and make cleanup easy.
For the biscuit base, traditional graham crackers work well, but digestive biscuits add a deeper, maltier flavor. If you’re interested in crumb alternatives, this almond crust guide shows a great gluten-free take.
A couple of tips:
- Always bring ingredients to room temp for a smoother mix.
- Don’t skip chilling! It firms texture and lets the flavor mature.
- Store leftovers in an airtight container—up to 5 days refrigerated, or freeze for up to 2 months.
Serving and Storing Mini Cheesecakes
Perfect Presentation
Presentation matters, especially for something this adorable. You can jazz things up by adding a dollop of whipped cream, a berry, or even edible flowers. I like to place mine on a wooden cutting board lined with parchment when serving at parties—rustic and stylish.
These are fantastic finger foods. No need for slicing or worry about uneven pieces. Place them in individual ramekins or cute cupcake wrappers if you’re packing them for road trips or picnics.
You’ll see a simple, charming elegance similar to what we featured in coconut vanilla bean dessert cups.
Storing for Later Joy
Once cooled and chilled, mini cheesecakes hold up wonderfully. Wrap each in plastic wrap and store in containers if stacking. Here’s how duration breaks down:
| Storage Method | Lifespan |
|---|---|
| Refrigerated (airtight) | Up to 5 days |
| Frozen (wrapped tightly) | Up to 2 months |
Allow frozen cheesecakes to thaw in the fridge overnight before serving. Avoid microwaving—texture suffers.
FAQ
Does Costco have mini cheesecakes?
Yes, Costco frequently carries mini cheesecakes, especially around holidays. However, their ingredient list often includes stabilizers and preservatives. If you prefer whole-food versions you can customize, making them at home is a tastier and healthier option.
What to use to make mini cheesecakes?
All you need is a muffin tin and paper liners (or silicone baking cups), a mixing bowl, and a hand mixer or whisk. The recipe calls for cream cheese, sugar, eggs, and graham crumbs—no fancy equipment!
What is the biscuit base for mini cheesecake?
The base typically uses crushed graham crackers mixed with melted butter. You can also use digestive biscuits or even crushed vanilla wafers for unique spins.
How to know if mini cheesecake is cooked?
Gently shake the pan at the end of baking—edges should be set and the center should jiggle slightly. The key is avoiding overbaking, which leads to dry or cracked tops.
Conclusion
Mini cheesecakes are that perfect mix of homemade comfort and shareable charm. No stress, no complex tools—just delicious moments baked into every bite. Whether you’re channeling a childhood memory or exploring bold new pairings, these little desserts deliver in flavor and simplicity. I hope you’ll find joy in crafting them as much as I do. You’ll feel right at home—and just a little fancy—every time they bake.